Mesh Slicer: Mesh Slicing
Rotatable Plane
Let’s start off with the rotatable plane. I created a material that highlights the surface it intersects, which I use to target the area that should be sliced. Holding the right mouse button will make the camera assume a position closer to the plane and you rotate the plane by moving the mouse horizontally. I use the mouse x delta to rotate the plane's roll axis.

Box Cast
Pressing the left mouse button will perform the cut. To capture all the gameobjects that intersect the plane I cast a collision box in the shape of the plane with its current orientation.

Preparation
Before slicing the mesh, I declare variables that will be used throughout the process:
-
Plane cutPlane is a struct that can tell me which side of the plane a triangle's vertice lies on. For the plane to function correctly, I translate the plane from world space to the target gameobjects local/ model space.
-
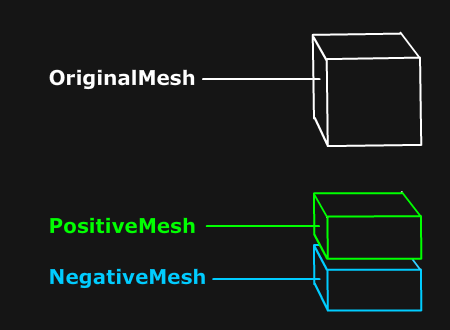
Mesh originalMesh, the mesh of the target object that will be cut in half.
-
MeshData positiveMesh/negativeMesh is used to store triangle data to construct a mesh. All triangles above the plane go to the positiveMesh while the triangles below the plane go to the negativeMesh.
-
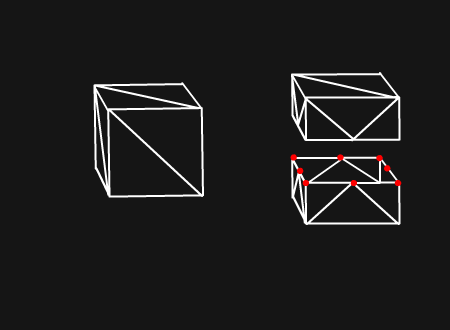
List<Vector3> intersectingPoints, I keep track of all the points of intersection where the mesh’s triangles intersect the plane. This data will then be used to create a new surface for the sliced area for the two mesh halves.


Splitting the Mesh
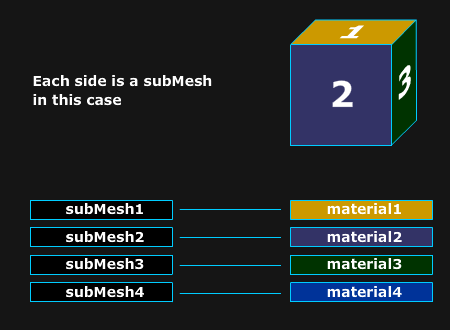
Each mesh has sub-meshes, which means that a mesh can be made up of several meshes. This is important for me to keep track of as each mesh can use a different texture/ material which I will take advantage of later.
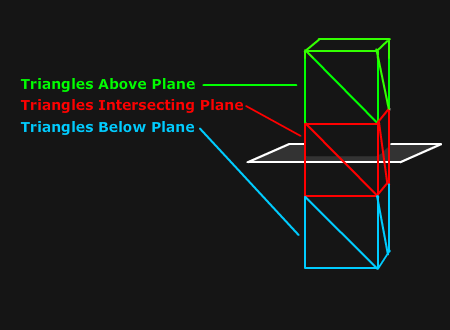
For now, I need to loop through all the triangles within the original mesh’s sub-meshes and sort them into the positive and negative mesh half.
Using Unity’s Plane struct I check which vertices in the triangle lie above or below the plane. I handle three cases:
-
Case 1: The triangle is above the plane. Place in positiveMesh.
-
Case 2: The triangle is below the plane. Place in negativeMesh.
-
Case 3: The triangle is intersecting the plane. Split the triangle into three new ones and place them in the appropriate mesh half.

Splitting a Triangle
Our goal here is to split the triangle into three new triangles and place them in the appropriate meshData half.
I start by sorting the vertices belonging to the intersecting triangle into the variables positiveTriangle and negativeTriangle. These are incomplete triangles that only hold half of a triangle’s vertices. This means that one triangle half will only hold one vertice while the other holds two.
I sort those triangles into two new variables, largeTriangle which always contains the larger triangle half, and the other to smallerTriangle which contains one vertice. This is important as I’ll access specific elements in each of the triangle halves vertice array and sorting them will prevent me from accessing an element out of bounds.


Finding the Intersection Points
Next, we’ll find the two intersecting points of the triangle and create their respective normals and uv coordinates.
I raycast between two vertices belonging to opposite sides of the plane to receive the distance where the intersection happened from the ray’s origin. This is useful as now I can create a percentage of the distance traveled between the two vertices for a lerp function. Using this percentage as a lerp value I can create the vertice, normal and uv coordinates for each point intersection.

Assembling new Triangles
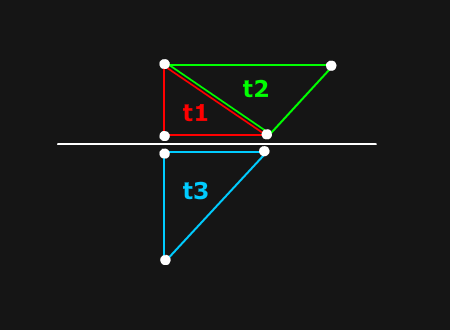
Now with all the necessary data for the intersection points. We can start “slicing” the triangle by replacing the intersected triangle with the sliced triangles.
I assemble three triangles by combining the vertices in specific orders as the image demonstrates.

Flipping the Triangle
Before adding a new triangle to the appropriate mesh, I make sure the triangle is facing the same way as the triangle’s surface normal.
I do this by creating a cross-product from two vectors using the triangle's vertices. Then I perform a dot product using the plane's normal with the cross product to see if the cross product is angled in the same general direction as the plane normal. If the dot product is less than 0, then it means the triangle is facing the opposite direction of the plane normal.
In order to flip the direction I need to flip the winding order of the triangle so that it will be visible in the appropriate angle.
I repeat this process for all three triangles and place them in the appropriate mesh half.
Hollow Mesh
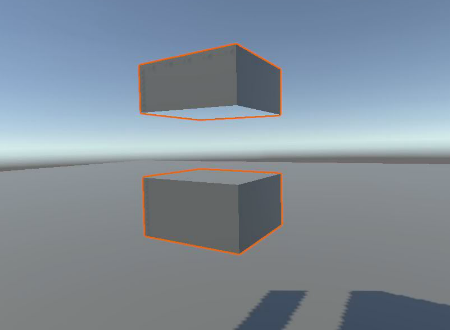
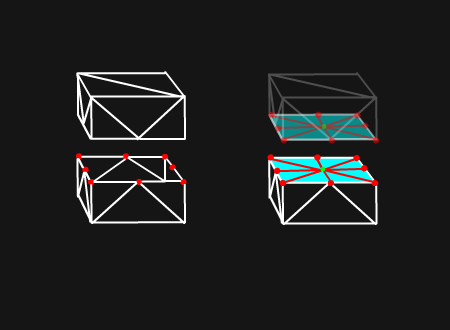
Now the mesh has been successfully split in half! But the mesh is invisible when looking at it from the inside. To complete the mesh, an extra surface for the sliced area needs to be made.
Patching up the Sliced Area
Using all the intersection points from all the intersecting triangles I calculate the center of the surface.
Since the shape of the surface will be the same, I create triangles for both the positive and negative mesh. Each triangle uses the center and a pair of intersecting points for the vertices. Then I use the plane normal for the positive and flip the normal for the negative mesh. The uv coordinates are arbitrary as I am only using a material with a singular color.
After I place the triangle in the positiveMesh I flip the winding order of the triangle and then place it in the negativeMesh.
Finalize
The two half meshes are now complete with their sliced areas patched up.
All that’s left is creating two new gameobjects with a mesh half. Then I add the materials for the new mesh from the original gameobject, but also applied a different material for the sliced surface.
I figured out that the array of sub-meshes and array of materials is connected parallel to each other. Since I want to add a different material to the sub-mesh with the sliced area I just need to add a new element to the materials array with the new material.

Closing thoughts
Overall, I am satisfied with the feature, despite the lack of vfx that would really amp up the experience.
If there is one thing I would like to improve would be the performance since it starts to lag when slicing multiple meshes at once. This is most likely due to the number of iterations and raycasts that are being performed to find the plane's intersection points.
I don't believe there is an easy way to avoid the raycasts. Perhaps a thread pool could be used to slice each mesh on a separate thread to speed up the process.
That’s it for the Mesh Slice section!
Feel free to try out the project from my github and study the codebase.